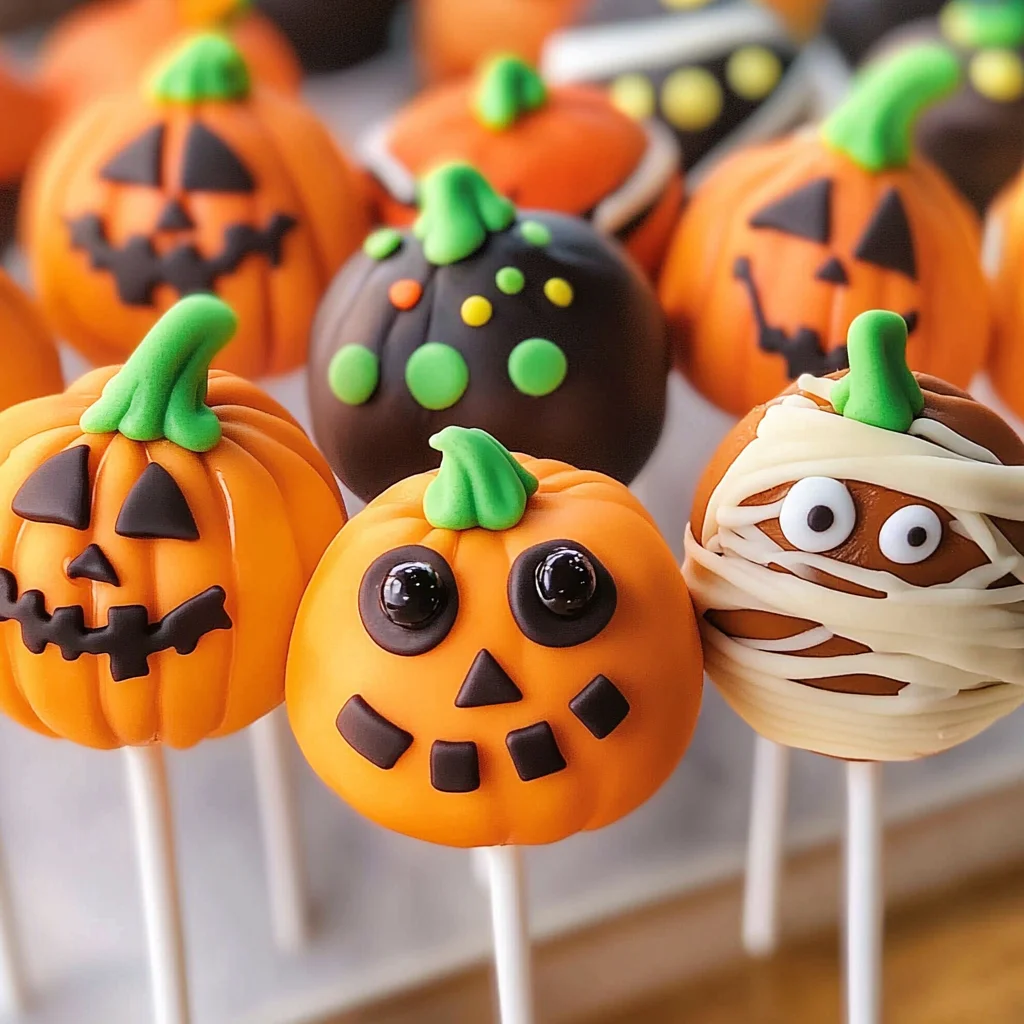
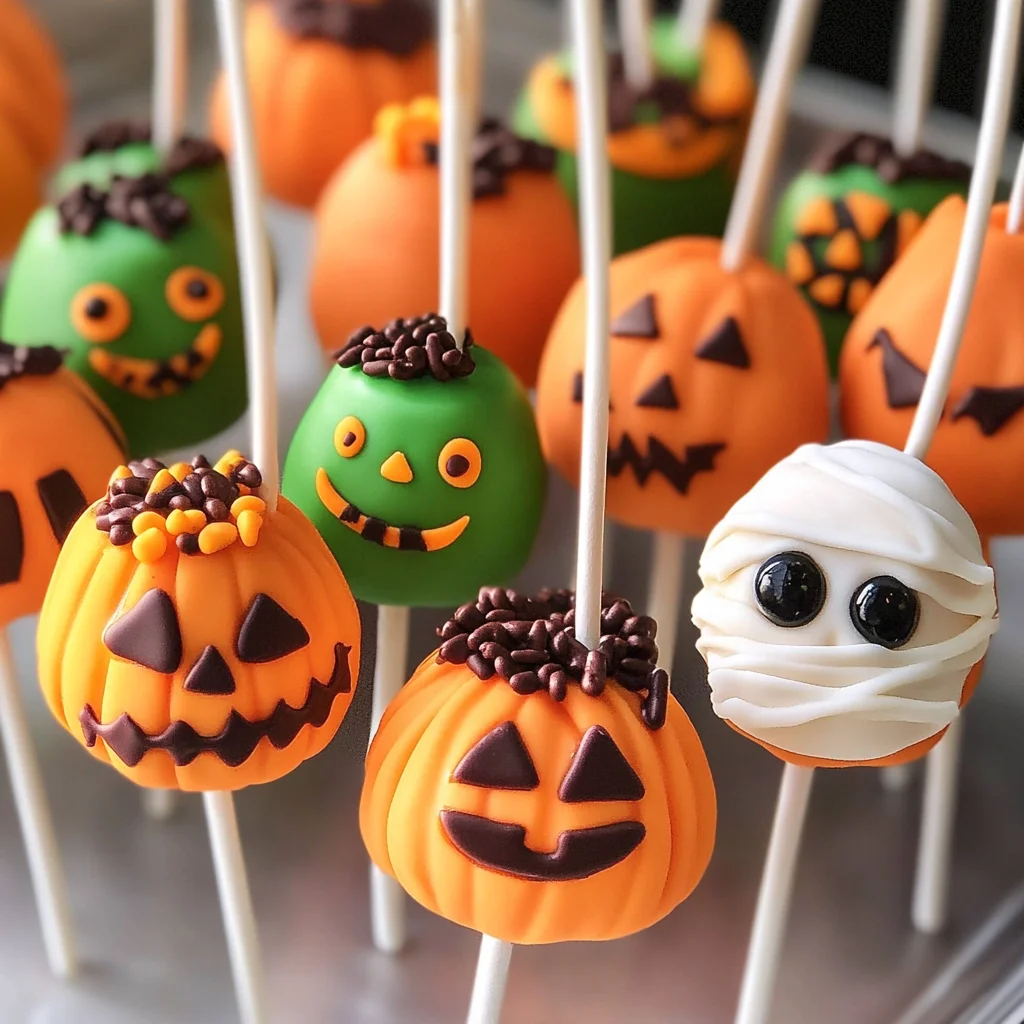
Halloween Cake Pops
Add these spooky cake pops to your next Halloween party. Halloween Cake Pops are delightful bite-sized treats that can be decorated to resemble creepy characters like pumpkins, mummies, and even Frankenstein. These fun and festive treats are perfect for gatherings, offering a sweet touch to your Halloween festivities. Their versatility allows you to customize flavors and designs, making them a standout at any celebration.
Why You’ll Love This Recipe
- Easy to Make: With just a few simple steps, you can whip up these delicious cake pops in no time.
- Creative Fun: Decorating the cake pops is an enjoyable activity for kids and adults alike, unleashing your creativity.
- Versatile Flavors: You can use your favorite cake mix, whether it’s vanilla or chocolate, to suit your taste.
- Perfect for Any Occasion: While they shine at Halloween parties, these cake pops can be enjoyed year-round for birthdays or celebrations.
- Cute Presentation: These adorable treats will impress guests with their fun designs and colors.
Tools and Preparation
To create these delightful Halloween Cake Pops, you’ll need some essential tools. Having the right equipment makes the process smoother and more enjoyable.
Essential Tools and Equipment
- Mixing bowl
- Electric mixer
- Baking pan
- Cookie sheet
- Microwave-safe bowl
- Parchment paper
Importance of Each Tool
- Mixing bowl: A large mixing bowl is essential for combining ingredients easily without making a mess.
- Electric mixer: Using an electric mixer saves time and ensures a smooth batter consistency.
- Baking pan: A 13 x 9 baking pan is perfect for baking the cake evenly.
- Microwave-safe bowl: This is crucial for melting Candy Melts quickly without burning them.
Ingredients
Add these spooky cake pops to your next Halloween party. Made with vanilla or chocolate cake, decorate these bite-sized pieces of cake for Halloween including a Pumpkin, Frankenstein, and a Mummy.
For the Cake
- 1 box Favorite cake mix
- 1 3.4 oz box instant pudding mix
- 4 eggs
- 1 cup water
- 1/3 cup vegetable oil
For the Frosting and Coating
- 1 cup Frosting
- Candy Melts
- Toppings – sprinkles, candy eyes
How to Make Halloween Cake Pops
Step 1: Preheat the Oven
Preheat your oven to 350°F. Spray your 13 x 9 pan with vegetable pan spray.
Step 2: Mix the Batter
In a large bowl, combine the cake mix, pudding mix, eggs, water, and oil. Beat at medium speed for about 2 minutes until well blended. Pour into the lightly greased cake pan.
Step 3: Bake the Cake
Bake for 30-40 minutes or until a toothpick inserted in the center comes out clean. Let it cool in the pan for about 10 minutes before transferring it to a wire rack.
Step 4: Crumble the Cake
Once cooled, crumble the cake into small pieces using your hands or two forks until no large chunks remain.
Step 5: Add Frosting
Add frosting to the crumbled cake mixture. Mix with your fingers until everything is well combined.
Step 6: Form Cake Balls
Take small portions of the mixture and roll them into balls about one inch in diameter.
Step 7: Chill
Place the formed balls on a cookie sheet lined with parchment paper and chill in the refrigerator for at least 2 hours to help them firm up.
Step 8: Melt Candy Melts
Melt Candy Melts in a microwave-safe bowl in 30-second intervals at 50% power until smooth.
Step 9: Insert Sticks
Dip each stick into melted Candy Melts before inserting it into each chilled cake ball. Allow them to set; you can place them in the freezer for about 20 minutes to speed up this process.
Step 10: Dip in Candy Melts
Once firm, dip each pop completely into melted Candy Melts. Let excess candy drip off before placing on parchment paper.
Step 11: Decorate
Sprinkle on toppings like chopped-up candy or sprinkles while the coating is still wet. Enjoy your spooky Halloween Cake Pops!
How to Serve Halloween Cake Pops
Halloween cake pops are a delightful treat that can add a fun and festive touch to any gathering. Their bite-sized nature makes them easy to serve and enjoy at parties. Here are some creative serving suggestions to make your Halloween celebration even spookier.
On a Festive Platter
- Arrange your cake pops on a decorative platter with Halloween-themed designs. This visual appeal will attract guests and enhance the overall festive atmosphere.
As Party Favors
- Wrap individual cake pops in clear cellophane bags tied with orange or black ribbons. These make great party favors for guests to take home and enjoy later.
Display in Foam or Styrofoam
- Insert the cake pops into a block of foam or Styrofoam covered with decorative fabric. This method creates an eye-catching centerpiece for your table.
In Mini Pumpkin Holders
- Use small pumpkins as unique holders for your cake pops. Simply carve out the top of the pumpkin, creating a perfect space for each pop to stand upright.
How to Perfect Halloween Cake Pops
Creating perfect Halloween cake pops involves attention to detail and technique. Follow these tips to ensure they turn out deliciously every time.
- Choose the Right Cake Mix: Select a flavor you love, whether it’s vanilla or chocolate, as this will be the base of your cake pops.
- Ensure Proper Mixing: Mix the batter thoroughly for an even texture. Undermixing may lead to dry spots in your cake.
- Chill Before Dipping: Chilling the formed cake balls helps them hold their shape when dipped in melted Candy Melts.
- Control Melting Temperature: Melt Candy Melts slowly at 50% power in the microwave or on low heat on the stove to avoid burning.
- Use Quality Decorations: Enhance your Halloween cake pops with quality toppings like candy eyes and sprinkles for added texture and visual appeal.
Best Side Dishes for Halloween Cake Pops
Pairing side dishes with your Halloween cake pops can create a well-rounded dessert table. Here are some fantastic options that complement their sweetness:
- Spooky Cheese Platter: Include various cheeses shaped like ghosts or pumpkins along with crackers for an appealing savory option.
- Pumpkin Soup Shots: Serve warm pumpkin soup in small cups as a comforting and seasonal choice alongside sweet treats.
- Witch’s Brew Salad: A vibrant green salad topped with edible flowers and nuts adds freshness and color to your dessert spread.
- Ghoulish Veggie Platter: Create a platter filled with cut vegetables arranged to resemble creepy creatures, served with hummus or dip.
- Ghostly Fruit Cups: Fill cups with assorted fruits and top them with whipped cream ghosts for a light, refreshing side.
- Monster Meatballs: Offer meatballs decorated with eyes made from olives or cheese, adding a fun, savory contrast to the sweets.
Common Mistakes to Avoid
When making Halloween Cake Pops, it’s easy to overlook a few key details. Here are some common mistakes to watch for:
-
Skipping refrigeration – Failing to chill your cake balls can make them difficult to dip in melted Candy Melts. Always chill the formed cake balls for at least 2 hours.
-
Not crumbling evenly – If the cake isn’t crumbled well, the mixture won’t hold together. Make sure to break it down until there are no large chunks before adding frosting.
-
Using too much frosting – Adding too much frosting can make the cake balls too wet and hard to shape. Start with a small amount and add more gradually until you reach the right consistency.
-
Overheating Candy Melts – Melting Candy Melts too quickly can cause them to seize or burn. Heat in short intervals in the microwave or on low heat on the stovetop for best results.
-
Ignoring decoration timing – Waiting too long after dipping in Candy Melts to add decorations may cause them not to stick. Decorate while the coating is still wet for better adhesion.
Storage & Reheating Instructions
Refrigerator Storage
- Store Halloween Cake Pops in an airtight container.
- They will last for up to 1 week in the refrigerator.
- Ensure they are completely cooled before sealing to avoid moisture buildup.
Freezing Halloween Cake Pops
- Place them in a single layer on a baking sheet and freeze until solid.
- Transfer to an airtight container, separating layers with parchment paper.
- They can be frozen for up to 3 months.
Reheating Halloween Cake Pops
- Oven – Preheat oven to 300°F and place pops on a baking sheet for about 5 minutes until warmed through.
- Microwave – Heat one pop at a time on a microwave-safe plate for about 15 seconds, checking frequently.
- Stovetop – Use a pan on low heat; cover with a lid and warm for a few minutes, ensuring they don’t melt.
Frequently Asked Questions
What are Halloween Cake Pops?
Halloween Cake Pops are bite-sized treats made from crumbled cake mixed with frosting, shaped into balls, coated in melted candy, and decorated festively for Halloween.
Can I use any cake mix for my Halloween Cake Pops?
Yes! You can use any flavor of cake mix you prefer, whether it’s vanilla, chocolate, or even spice cake for an autumn twist!
How do I decorate Halloween Cake Pops?
You can use melted Candy Melts or chocolate as a base and add fun toppings like sprinkles, candy eyes, or edible glitter to create spooky designs like pumpkins or monsters.
What is the best way to transport Halloween Cake Pops?
Store them upright in a sturdy container or use foam blocks with holes cut out for each pop. This prevents damage during transport.
Can I customize my Halloween Cake Pops?
Absolutely! Feel free to experiment with different flavors of cake and frosting, as well as unique decorations that match your party theme!
Final Thoughts
These Halloween Cake Pops are not only festive but also versatile. You can customize them with various flavors and decorations to suit your taste. Perfect for any Halloween gathering, these treats are sure to delight guests of all ages—give them a try!
Halloween Cake Pops

Add a festive touch to your Halloween celebrations with these delightful Halloween Cake Pops! These charming, bite-sized treats are incredibly easy to make and can be customized to resemble spooky characters like pumpkins, mummies, and Frankenstein. Perfect for parties or as creative gifts, these cake pops bring joy and sweetness to any gathering. With simple ingredients and fun decorating options, they are a great activity for families and friends to enjoy together. Let your creativity shine as you whip up these colorful cake pops that will impress guests of all ages!
- Prep Time: 15 minutes
- Cook Time: 40 minutes
- Total Time: 55 minutes
- Yield: Approximately 20 cake pops 1x
- Category: Dessert
- Method: Baking
- Cuisine: American
Ingredients
- 1 box favorite cake mix
- 1 3.4 oz box instant pudding mix
- 4 eggs
- 1 cup water
- 1/3 cup vegetable oil
- 1 cup frosting
- Candy Melts
- Toppings (sprinkles, candy eyes)
Instructions
- Preheat the oven to 350°F and spray a 13 x 9-inch baking pan with vegetable spray.
- In a large mixing bowl, combine cake mix, pudding mix, eggs, water, and oil; beat at medium speed for 2 minutes until blended.
- Pour the mixture into the prepared pan and bake for 30-40 minutes or until a toothpick comes out clean. Cool in the pan for 10 minutes before transferring to a wire rack.
- Once cooled, crumble the cake into small pieces in a bowl.
- Mix in frosting until well combined.
- Roll mixture into one-inch balls and chill on a parchment-lined cookie sheet for at least two hours.
- Melt Candy Melts in intervals until smooth.
- Dip sticks into melted Candy Melts before inserting them into each chilled ball; freeze for about 20 minutes.
- Dip each pop into melted Candy Melts and let excess drip off before placing on parchment paper.
- Decorate with toppings while the coating is wet.
Nutrition
- Serving Size: 1 serving
- Calories: 145
- Sugar: 15g
- Sodium: 75mg
- Fat: 5g
- Saturated Fat: 1g
- Unsaturated Fat: 3g
- Trans Fat: 0g
- Carbohydrates: 23g
- Fiber: <1g
- Protein: 2g
- Cholesterol: 30mg